Contracts
This article outlines the benefits of Sonovate Contracts and provides a detailed step-by-step guide on how to use them within the platform.
- What is the contracts feature?
- What are the benefits?
- How to set up contracts for a client and a supplier/worker
- FAQs
What is the contracts feature?
You can now send contracts to both your client and your supplier/worker from within the Sonovate app, allowing you to quickly and easily lock in that deal you've been working hard on. No more rekeying data or sending contracts manually via email.
This is an add-on feature - if you don't see it on your assignments screen, then please speak to Sales about getting access.
What are the benefits of using Sonovate contracts?
- Efficiency: create and issue contracts for your assignments with just a few clicks, minimising administrative delays.
- Transparency: you can preview your contracts before sending them off, then get a real-time view into whether your contracts have been viewed or signed by the recipients.
- Security: lock in your deals quickly and easily.
![]()
How to Set up Contracts for a Client and a Supplier/Worker
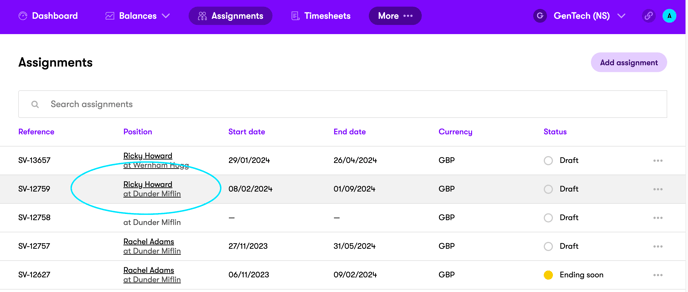
Step 1: Open the Assignment
Let's start by selecting the assignment that you would like to submit contracts for.

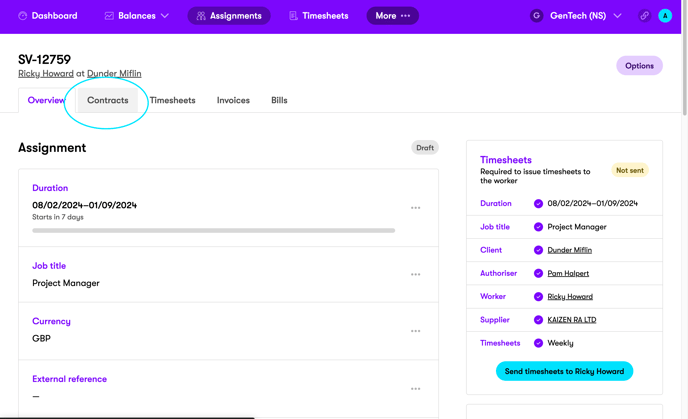
Step 2: Navigate to the Contracts Tab
To access the Contracts feature, click on the 'Contracts' tab.

Step 3: Add notice period (optional)
The contract schedule will generate based on the assignment data you've entered. You can now optionally add a notice period, which will then update the schedule.

Step 4: Add your terms
You need to add terms to your contract before sending it out.
You have the option of using either:
- Sonovate standard terms
- Uploading your own terms
If you're using Sonovate terms, you have the ability to add additional terms, which will be appended to the contract.
If you're using your own terms, upload a pdf document. These will be saved so that you can use them for future assignments
Whichever terms you select will be sent with the schedule for e-signing.

Step 5: Preview your contract
Your contract can be previewed to allow you to make any amendments before issuing it. It can also be downloaded from the preview pane.

Step 6: Issuing your contract
Any contacts that you have at the client will be available to choose here. You also have the ability to send the signed contract to another contact (the person who signed the contract will always receive a copy).

When the recipient clicks on the link in the email, they will be taken to an e-signing page. From there they can sign the contract. They can also download it before signing if they need to.

Step 7: Monitor Progress
Once you have issued your contract, you will be able to track its progress in the 'Activity' tab. In the example below, the contract has now been sent to the client contact's email, viewed, and has been signed. (You can also see on the tabs above that the supplier contract has not been issued yet.)
![]()
Step 8: Supplier Contract
If you want to send a Supplier contract, then click on the 'Supplier' tab, and follow the same process as with the client contract.
![]()
FAQs
- Can I re-issue contracts? Yes, you can re-issue contracts at any point or send them to different recipients.
- What if I need to make a change to a contract after it has been signed? No problem - by changing anything on the assignment relevant to the contract, it will create you a new version. You will still be able to access the old signed version, but you will also have a new draft version. This will need to be re-issued and signed.

- Can I download a contract? Yes, at any point you can download a copy of the contract from the preview pane. But you may not need to. Here's why: all contract recipients will automatically be sent a pdf of the contract after they've signed. And they can also download a copy themselves, before they even sign it (if they need to get it reviewed by someone).
- Can the assignment still go live if the contract isn't sent? Yes. Contracts are entirely optional on a Sonovate assignment, so you have full control over if and when you send them. Your worker can still start filling in their timesheets even if there is no signed contract, if you like.
![]()